Website Integration
Video
Appendix
Before explaining how to add Rasa to a website, it might make sense to talk about the Rasa architecture in general. You may recall from earlier videos that a Rasa deployment that uses custom actions consists of two separate serivces. One service handles the custom actions and another handles the machine learning pipelines and the conversational events.
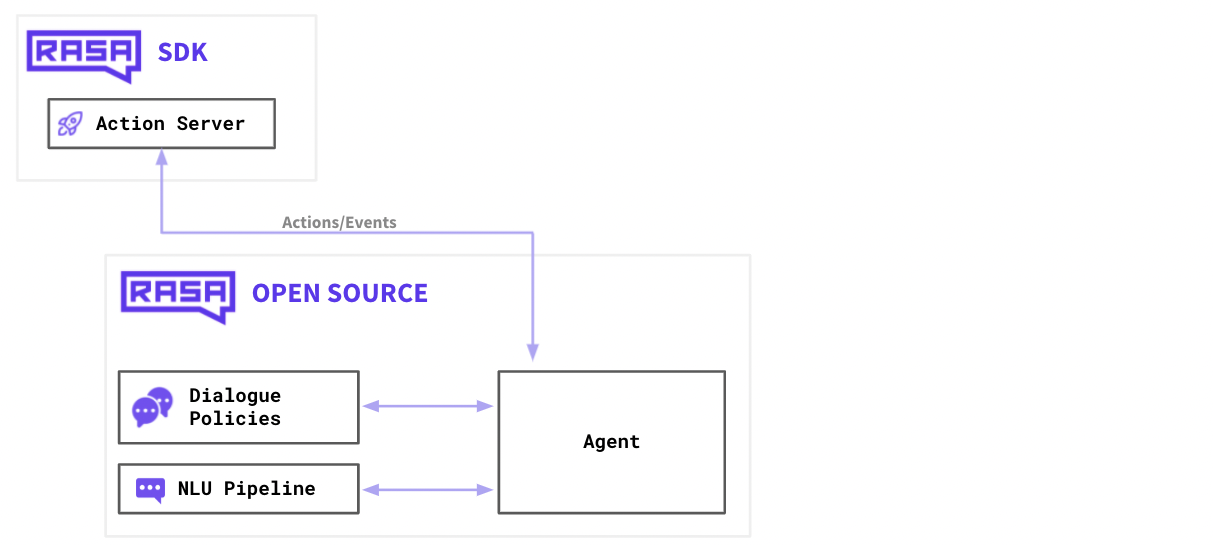
If we were to push this to production though, we'd need more services attached.
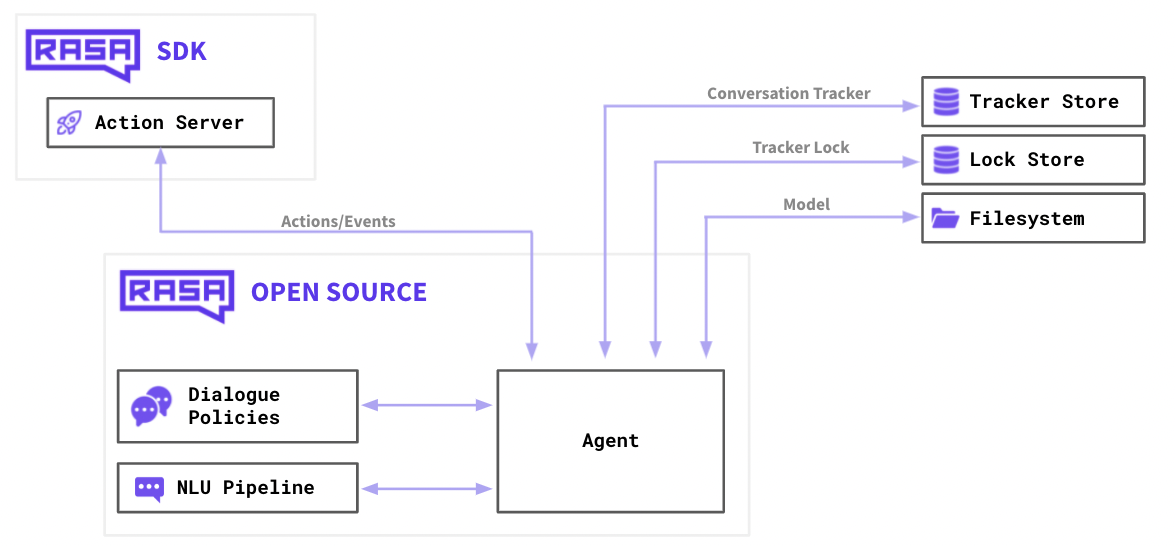
We'd need a Tracker Store that can store all the conversations. When you're
working on a local machine this may fit in memory, but in production you may
have thousands of users and will likely use a database for this.
You'll also need
a Lock Store. Rasa uses a ticket lock mechanism to ensure that incoming messages
for a given conversation ID are processed in the right order, and locks
conversations while messages are actively processed. This means multiple
Rasa servers can be run in parallel as replicated services, and clients do not
necessarily need to address the same node when sending messages for a given
conversation ID.
You'll also need some sort of Filesystem where you can store your
training data as well as your trained models. This can be the disk on your
local machine but it may also refer to disk space on a cloud resource.
There's one extra thing that's missing in this diagram though, and that's how our users are going to connect to our assistant.
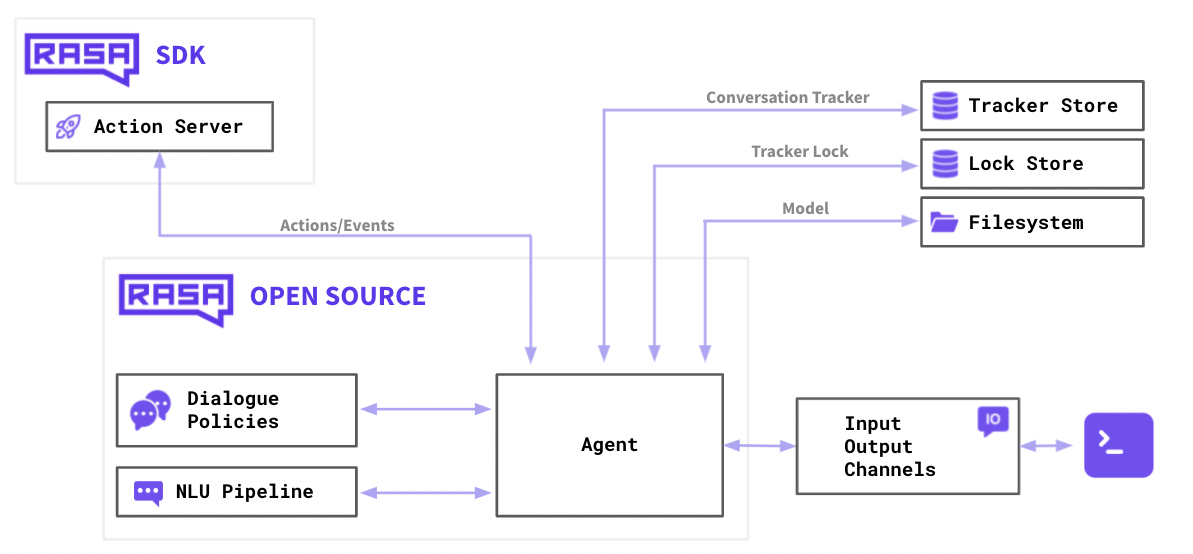
So far, we've only been interacting with Rasa via the terminal. When you launch
rasa shell you'll start a small server on your machine and your terminal will
communicate with Rasa over HTTP under the hood. Being able to communicate over
HTTP is great because it means that we can connect a website to it as well, but
it's good to understand that this is but one of the many channels that Rasa supports.
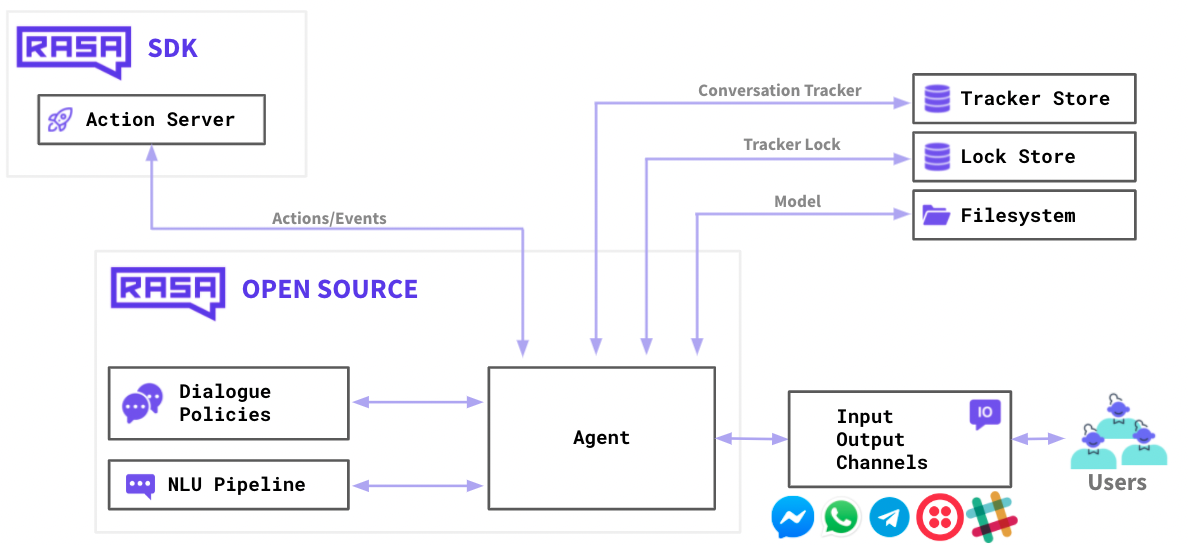
You can configure your credientials.yml file to also allow other input/output channels.
That way, you can configure Rasa to communicate over slack, facebook messenger, whatsapp
or any other supported channel.
# This file contains the credentials for the voice & chat platforms# which your bot is using.# https://rasa.com/docs/rasa/messaging-and-voice-channels
rest:# You don't need to provide anything here - this channel doesn't# require any credentials.

facebook:  verify: "<verify>"  secret: "<your secret>"  page-access-token: "<your page access token>"
slack:  slack_token: "<your slack token>"  slack_channel: "<the slack channel>"  slack_signing_secret: "<your slack signing secret>"
socketio:  user_message_evt: "<event name for user message>"  bot_message_evt: "<event name for bot messages>"  session_persistence: "<true/false>"
mattermost:  url: "https://<mattermost instance>/api/v4"  token: "<bot token>"  webhook_url: "<callback URL>"
In this tutorial we're going to implement a demo for Rasa on a website, but it's good to understand the architecture and how you can implement Rasa for other channels as well.
Code
You can also copy the full project for this from from Github if you'd like.
Let's implement a very basic front end with Rasa. We'll use the chatroom.js project
for this. Here's the index.html file that we'll use.
<head> <link rel="stylesheet" href="https://npm-scalableminds.s3.eu-central-1.amazonaws.com/@scalableminds/chatroom@master/dist/Chatroom.css" /></head><body> <div class="chat-container"></div> <script src="https://npm-scalableminds.s3.eu-central-1.amazonaws.com/@scalableminds/chatroom@master/dist/Chatroom.js"/></script> <script type="text/javascript"> var chatroom = new window.Chatroom({ host: "http://localhost:5005", title: "Chat with Me!", container: document.querySelector(".chat-container"), welcomeMessage: "Hi. How may I help you?", speechRecognition: "en-US", voiceLang: "en-US" }); chatroom.openChat(); </script></body>We can launch this static site by running two commands in two terminals
# This command launches the front-end. Make sure that you use Python 3
python -m http.server 8000
# This command launches the Rasa backend
python -m rasa run --enable-api --cors="*" --port 5005
When you now go to http://localhost:8000 you should see a user interface that can
communicate to Rasa for you. Remember that if you're running custom actions that you'd
need to run an extra service for that as well.
Debug
If you're building a site and you're debugging, we recommend running Rasa via;
python -m rasa run --enable-api --cors="*" --port 5005 --debug
That way, you'll get more logs, which can help you debug.
Links
Exercises
Try to answer the following questions to test your knowledge.
- Can you explain what the Tracker store and the Lock store are for?